

Shell out and parse
Spawn pcu-cli dio get di1 --quiet as a subprocess, capture stdout, and check the exit code. Parse the output into a boolean: 1 means the signal is live, 0 means it is not, and anything else means the read failed.
This content is for the 1.0.0 version. Switch to the latest version for up-to-date documentation.
This use case wires a switched vehicle signal into a digital input on an In-CarPC CQ40 series PC,
then reads it from your own application by calling pcu-cli. The worked example is a door switch
polled by on-board software so it can react when the doors open, but the same pattern fits any
on/off signal: reverse gear, handbrake, a dash button, an accessory feed.
There is no driver development and no low-level hardware code on your side. To your software the
input is a boolean: it spawns the supplied command-line tool as a subprocess and reads 1 or 0
from stdout.
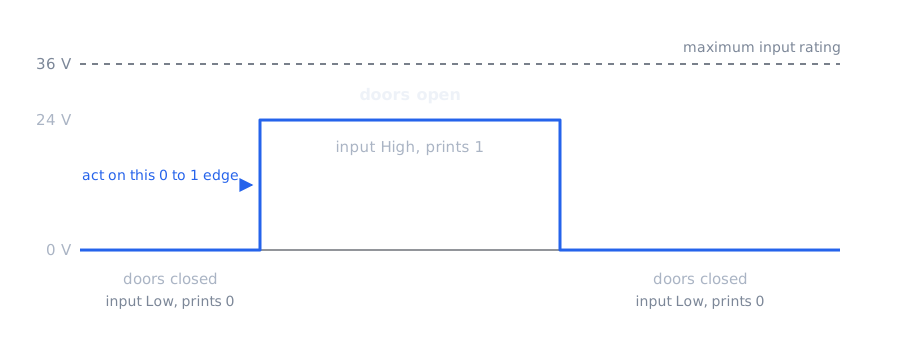
A typical door switch on a 24 V vehicle puts 24 V on the line while the doors are open and switches the line to ground (0 V) while they are closed. In other words the signal is active-high. The digital input reads High when voltage is present and Low at 0 V, so the two door states map cleanly onto the two logic levels:
| Door state | Line voltage | Input level | dio get di1 --quiet prints |
|---|---|---|---|
| Doors open | 24 V | High | 1 |
| Doors closed | 0 V (ground) | Low | 0 |
The CQ40 series inputs accept up to 36 V directly, so a standard 12 V or 24 V vehicle signal connects with no voltage divider, opto-isolator, or relay in between.
If your signal works the other way around, live when inactive (active-low), the same wiring applies and your software inverts the reading: a logical NOT on the boolean, nothing more.
Two wires into the terminal block:
Land the signal wire (the door switch output) on a digital input. This example uses DI1; DI2 works the same way.
Land the vehicle 0 V that the signal circuit uses on a GND terminal. Either GND terminal is fine.
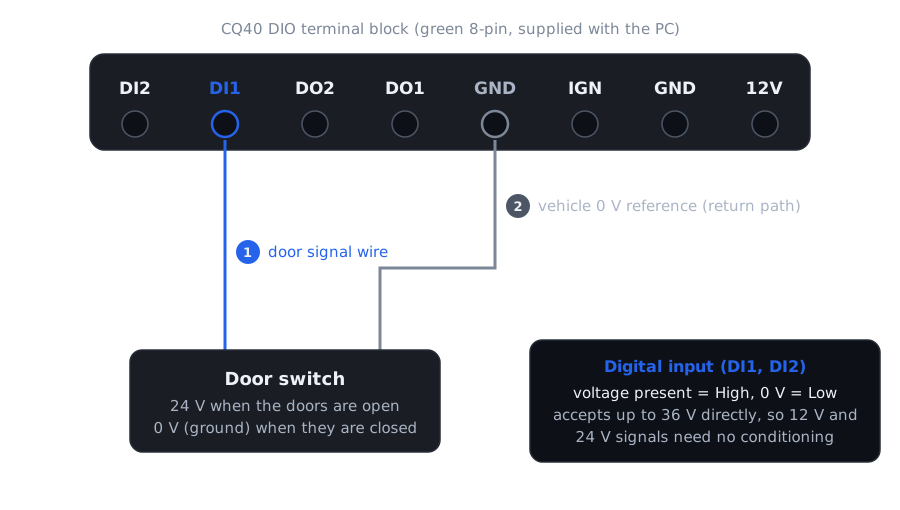
The ground wire matters. The input reads the signal voltage relative to the PC ground, and the switch voltage is relative to the vehicle 0 V. Landing an explicit wire from the signal circuit’s 0 V to a GND terminal gives both sides a common reference and makes the return path deliberate, rather than relying on chassis bonding. In practice the PC power negative usually already sits on vehicle 0 V, but the extra wire costs nothing and removes the assumption.
As with any low-level signal line, route the signal wire away from heavy current runs where practical.
pcu-cli needs low-level hardware access:
Install the PawnIO driver once per machine and run pcu-cli as Administrator. See
Install on Windows.
Run under sudo, or grant the port-I/O capability during setup. See
Install on Linux. Note that Linux support for the CQ40
series has not yet been validated on hardware; see
Supported Platforms.
While commissioning, pcu-cli dio shows every channel at once:
$ pcu-cli diopcu v1.0.0  - In-CarPC CQ40 series Digital I/O----------------------------------------  DI1                 : Low  DI2                 : Low  DO1                 : Low  DO2                 : Low  Ignition (IGN)      : On
  Note: outputs reset to off on reboot or power loss; the state is not saved.
For software, read the one channel you care about with --quiet, which prints a bare 0 or 1
to stdout and nothing else, so there is no output to parse beyond a single character. Doors closed:
$ pcu-cli dio get di1 --quiet0Doors open:
$ pcu-cli dio get di1 --quiet1If you prefer a structured record, --json emits one JSON object per read, with value as a JSON
boolean, true for High, ready for any standard JSON parser:
{ "channel": "di1", "value": true}The process exit code is 0 on a successful read, 1 on an error, and 2 when the platform has
no digital I/O. Treat anything other than exit code 0 with a clean 0 or 1 on stdout as
“signal unavailable”. See Scripting & Automation for the full flag and
exit-code reference.
The details depend on your application, but the same design points apply in any language; each of these is a few lines with whatever your runtime already offers for spawning a subprocess. The code examples below show the core read in several languages.
Shell out and parse
Spawn pcu-cli dio get di1 --quiet as a subprocess, capture stdout, and check the exit code. Parse the output into a boolean: 1 means the signal is live, 0 means it is not, and anything else means the read failed.
Budget time for each read
Treat the read as a blocking call with a bounded worst case: it normally returns quickly, but pcu serializes hardware access on system-wide bus mutexes and waits up to 5 seconds for a busy bus. Run it off your UI thread, and never start a new read while the previous one is in flight.
Act on the edge, not the level
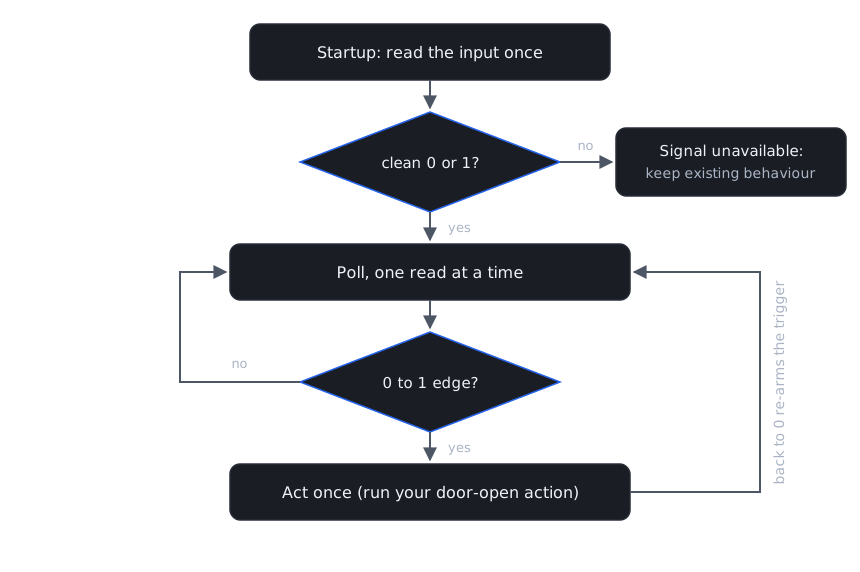
The trigger is edge-detected, not level-detected: keep the previous reading and fire only on the rising edge, the transition from 0 to 1, so the action runs once when the doors open rather than on every poll while they sit open. Store each new reading: the next 0 re-arms the trigger for the following opening.
Fail towards your existing behaviour
Run one read at startup as a capability probe. If it does not return a clean 0 or 1, the signal is unavailable on that machine, and your software should degrade gracefully to what it does today. That keeps the feature additive: ship it fleet-wide, enable it per vehicle as the wiring is completed.
Put together, the whole integration is one small state machine holding a single boolean of state:
The core read, minimal on purpose: spawn pcu-cli, capture stdout, and map the result onto a
three-state value. Every example implements the same contract:
| Reading | --quiet stdout | --json value | Exit code | The function returns |
|---|---|---|---|---|
| High (doors open) | 1 | true | 0 | true |
| Low (doors closed) | 0 | false | 0 | false |
| Failed read | anything else | absent or unparseable | any non-zero | null (None, Nothing, $null, unavailable) |
A null result means the read failed, whatever the reason, and your software should fall back to its existing behaviour. Each tab shows the read function, then the caller acting on the three-state result.
using System.Diagnostics;
// true = High, false = Low, null = signal unavailable.static bool? ReadDoorSignal(){ // Only stdout is redirected: pcu-cli's error text stays on stderr, so it // reaches your service log instead of the value you parse. var psi = new ProcessStartInfo("pcu-cli", "dio get di1 --quiet") { RedirectStandardOutput = true, UseShellExecute = false, // required for redirection }; using var process = Process.Start(psi); if (process is null) return null; // Drain stdout before WaitForExit: safe with one redirected stream, and // never deadlocks on a full pipe buffer. string stdout = process.StandardOutput.ReadToEnd().Trim(); process.WaitForExit(); // Non-zero covers an error (1) and a platform without digital I/O (2). if (process.ExitCode != 0) return null; // Anything but a bare 0 or 1 is not a valid reading. return stdout switch { "1" => true, "0" => false, _ => null };}switch (ReadDoorSignal()){ case true: StartDoorOpenActions(); break; case false: break; // doors closed, nothing to do case null: break; // signal unavailable, keep existing behaviour}Imports System.Diagnostics
' True = High, False = Low, Nothing = signal unavailable.Function ReadDoorSignal() As Boolean? ' Only stdout is redirected: pcu-cli's error text stays on stderr, so it ' reaches your service log instead of the value you parse. Dim psi As New ProcessStartInfo("pcu-cli", "dio get di1 --quiet") With { .RedirectStandardOutput = True, .UseShellExecute = False ' required for redirection } Using proc As Process = Process.Start(psi) If proc Is Nothing Then Return Nothing ' Drain stdout before WaitForExit so a full pipe buffer can never ' deadlock the wait. Dim stdout As String = proc.StandardOutput.ReadToEnd().Trim() proc.WaitForExit() ' Non-zero covers an error (1) and a platform without digital I/O (2). If proc.ExitCode <> 0 Then Return Nothing ' Anything but a bare 0 or 1 is not a valid reading. If stdout = "1" Then Return True If stdout = "0" Then Return False Return Nothing End UsingEnd FunctionDim doors As Boolean? = ReadDoorSignal()If Not doors.HasValue Then ' Signal unavailable, keep existing behaviour.ElseIf doors.Value Then StartDoorOpenActions()End Ifimport subprocess
def read_door_signal() -> bool | None: """True = High, False = Low, None = signal unavailable.""" try: # A busy hardware bus can hold a read for up to 5 seconds, so cap the # subprocess at 10 rather than waiting forever. result = subprocess.run( ["pcu-cli", "dio", "get", "di1", "--quiet"], capture_output=True, text=True, timeout=10, ) except (OSError, subprocess.TimeoutExpired): # OSError: pcu-cli is not installed or not on PATH. return None # Non-zero covers an error (1) and a platform without digital I/O (2). if result.returncode != 0: return None # Anything but a bare 0 or 1 is not a valid reading. return {"1": True, "0": False}.get(result.stdout.strip())match read_door_signal(): case True: start_door_open_actions() case False: pass # doors closed, nothing to do case None: pass # signal unavailable, keep existing behaviourfunction Read-DoorSignal { # $true = High, $false = Low, $null = signal unavailable. # Capture stdout straight into a variable; piping into another cmdlet here # can end the pipeline early and leave $LASTEXITCODE unset. $value = & pcu-cli dio get di1 --quiet 2>$null # Non-zero covers an error (1) and a platform without digital I/O (2). if ($LASTEXITCODE -ne 0) { return $null } switch ("$value") { '1' { return $true } '0' { return $false } default { return $null } # anything else is not a valid reading }}$doors = Read-DoorSignalif ($null -eq $doors) { # Signal unavailable, keep existing behaviour.} elseif ($doors) { Start-DoorOpenActions}# Prints "on", "off", or "unavailable".read_door_signal() { local value value="$(pcu-cli dio get di1 --quiet 2>/dev/null)" # $? is the command substitution's exit status; non-zero covers an error (1) # and a platform without digital I/O (2). if [ "$?" -ne 0 ]; then echo unavailable return fi case "$value" in 1) echo on ;; 0) echo off ;; *) echo unavailable ;; # anything else is not a valid reading esac}case "$(read_door_signal)" in on) start_door_open_actions ;; off) ;; # doors closed, nothing to do *) ;; # signal unavailable, keep existing behaviouresacIf you would rather consume the structured output, swap --quiet for --json and replace the
string compare with a JSON parse: deserialize the object and read value as a boolean. The
tri-state contract is unchanged, a parse failure counts as unavailable too, and the caller
consumes the result exactly as above.
using System.Diagnostics;using System.Text.Json;
// true = High, false = Low, null = signal unavailable.static bool? ReadDoorSignalJson(){ var psi = new ProcessStartInfo("pcu-cli", "dio get di1 --json") { RedirectStandardOutput = true, UseShellExecute = false, }; using var process = Process.Start(psi); if (process is null) return null; string stdout = process.StandardOutput.ReadToEnd(); process.WaitForExit(); // Non-zero covers an error (1) and a platform without digital I/O (2). if (process.ExitCode != 0) return null; try { // A successful read prints exactly one object: // {"channel":"di1","value":<bool>} using var doc = JsonDocument.Parse(stdout); return doc.RootElement.GetProperty("value").GetBoolean(); } catch (JsonException) { // Unparseable output is not a valid reading. return null; }}Imports System.DiagnosticsImports System.Text.Json
' True = High, False = Low, Nothing = signal unavailable.Function ReadDoorSignalJson() As Boolean? Dim psi As New ProcessStartInfo("pcu-cli", "dio get di1 --json") With { .RedirectStandardOutput = True, .UseShellExecute = False } Using proc As Process = Process.Start(psi) If proc Is Nothing Then Return Nothing Dim stdout As String = proc.StandardOutput.ReadToEnd() proc.WaitForExit() ' Non-zero covers an error (1) and a platform without digital I/O (2). If proc.ExitCode <> 0 Then Return Nothing Try ' A successful read prints exactly one object: ' {"channel":"di1","value":<bool>} Using doc As JsonDocument = JsonDocument.Parse(stdout) Return doc.RootElement.GetProperty("value").GetBoolean() End Using Catch ex As JsonException ' Unparseable output is not a valid reading. Return Nothing End Try End UsingEnd Functionimport jsonimport subprocess
def read_door_signal() -> bool | None: """True = High, False = Low, None = signal unavailable.""" try: result = subprocess.run( ["pcu-cli", "dio", "get", "di1", "--json"], capture_output=True, text=True, timeout=10, ) except (OSError, subprocess.TimeoutExpired): return None # Non-zero covers an error (1) and a platform without digital I/O (2). if result.returncode != 0: return None try: # A successful read prints exactly one object: # {"channel": "di1", "value": <bool>} return bool(json.loads(result.stdout)["value"]) except (json.JSONDecodeError, KeyError, TypeError): # Unparseable output is not a valid reading. return Nonefunction Read-DoorSignal { # $true = High, $false = Low, $null = signal unavailable. $out = & pcu-cli dio get di1 --json 2>$null # Non-zero covers an error (1) and a platform without digital I/O (2). if ($LASTEXITCODE -ne 0) { return $null } try { # A successful read prints exactly one object: # {"channel":"di1","value":<bool>} return [bool]($out | ConvertFrom-Json).value } catch { return $null # unparseable output is not a valid reading }}The JSON variant needs jq on the PATH; without it, prefer the --quiet
form above.
# Prints "on", "off", or "unavailable". Requires jq.read_door_signal() { local out value # Non-zero covers an error (1) and a platform without digital I/O (2). out=$(pcu-cli dio get di1 --json) || { echo "unavailable"; return; } # jq exits non-zero on unparseable JSON, so garbage output lands in the # same guard as a failed read. value=$(printf '%s' "$out" | jq -r '.value') || { echo "unavailable"; return; } case "$value" in true) echo "on" ;; false) echo "off" ;; *) echo "unavailable" ;; esac}Two runtime notes that apply to every language:
pcu-cli needs: as Administrator on Windows, or as root (or with the granted port-I/O
capability) on Linux. See Reading the input.timeout; in the other languages apply your runtime’s equivalent
(for example Process.WaitForExit(milliseconds) in .NET) if your caller cannot tolerate an
unbounded wait.A short per-vehicle check once the wiring is in:
Install the driver on the PC (Windows: PawnIO, once per machine; see Install on Windows).
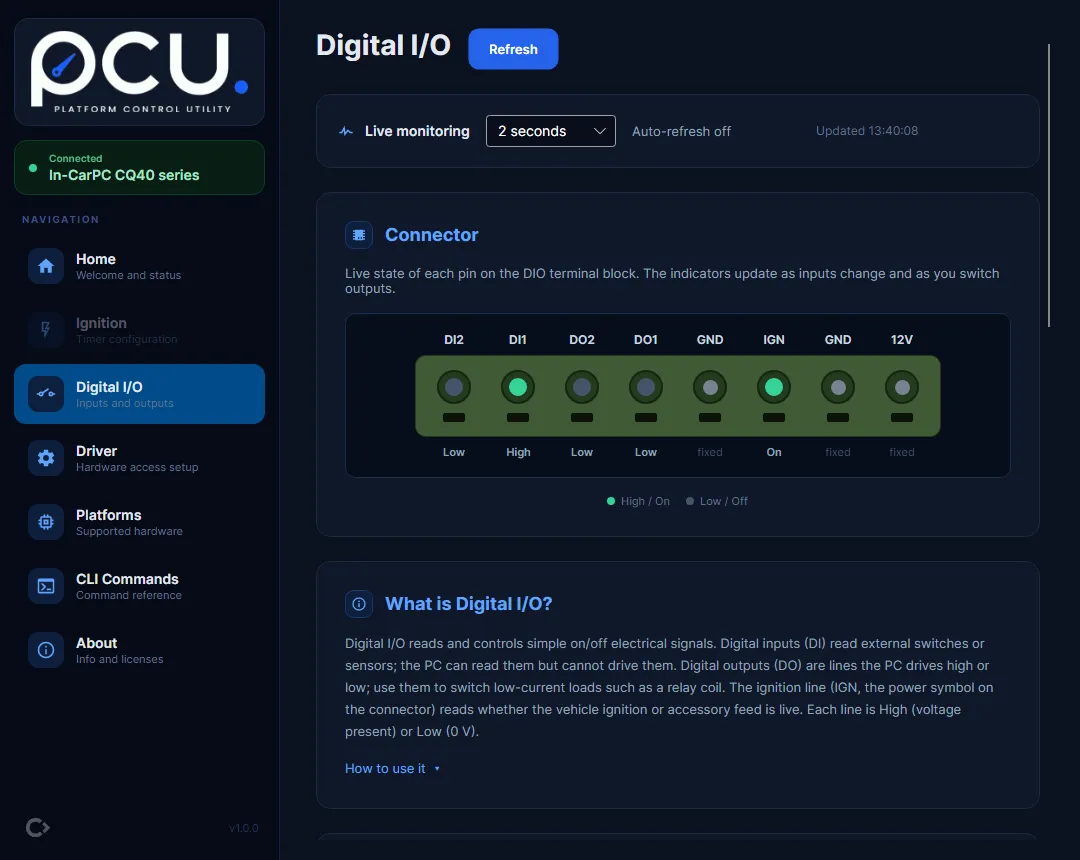
With the ignition on, run pcu-cli dio and operate the switch by hand. Confirm the input
toggles between Low and High. The Digital I/O page in the GUI draws
the connector live, which makes this check easy to watch:
Point your software at pcu-cli (full install path, or put it on the system PATH so it can be
called by name).
Trigger the real scenario end to end, on the road or simulated, and confirm your software reacts while the signal is live.
For the full command surface see the Command Reference, and for the channel and connector details see Digital I/O.